📌 Key Takeaways: How to Clean a Motorhome Safely
-
Preserving Vehicle Value: Regular deep cleaning removes damaging road grit, traffic film, and green algae, protecting the exterior paintwork and preventing long-term seal degradation.
-
Top-Down Cleaning Method: Always start washing from the roof and work your way down to prevent dirty runoff from streaking sections you have already cleaned.
-
Specialized Acrylic Window Care: Traditional household glass cleaners will scratch or chemical-crack plastic motorhome windows; always use dedicated, scratch-free acrylic cleaners and microfibre cloths.
-
Protecting Sensitive Seals: Avoid blasting window graphics, rubber seals, and appliance vents directly with high-pressure washers, as this can force water into the vehicle cabin and cause damp.
-
Interior Hygiene & Odour Control: Deep cleaning inside requires vacuuming hidden corners, wiping down upholstery, defrosting the fridge, and using specialized flush treatments to keep water tanks smelling fresh.
If you own a motorhome, then you’re probably familiar with how large they can be and how thoroughly they need to be cleaned.
The interior and exterior of your motorhome should be cleaned periodically, depending on how much it’s used. If you’re regularly on the road, it should be cleaned around once a month.
This will prevent your vehicle from becoming dirty and cluttered, making it more enjoyable to stay in. So, stick with us as we guide you through the process. You can even put some music on while cleaning and make it fun!
Gather Your Cleaning Supplies
Before you dive into the process, gather the following cleaning supplies:
Exterior
- Mild detergent
- Soft sponges and brushes
- Microfibre cloths
- Water hose with adjustable nozzle
- Protective wax or polish
- Glass cleaner
- Wheel brush and cleaner
Interior
- All-purpose cleaner
- Vacuum cleaner
- Glass cleaner
- Microfiber cloths/cleaning pads
- Soft bristle brushes
Kitchen and Bathroom
- Toilet cleaner
- Antibacterial surface wipes
- Sink and hob cleaner
Waste tank
- Tank cleaning solution
- Disposable gloves
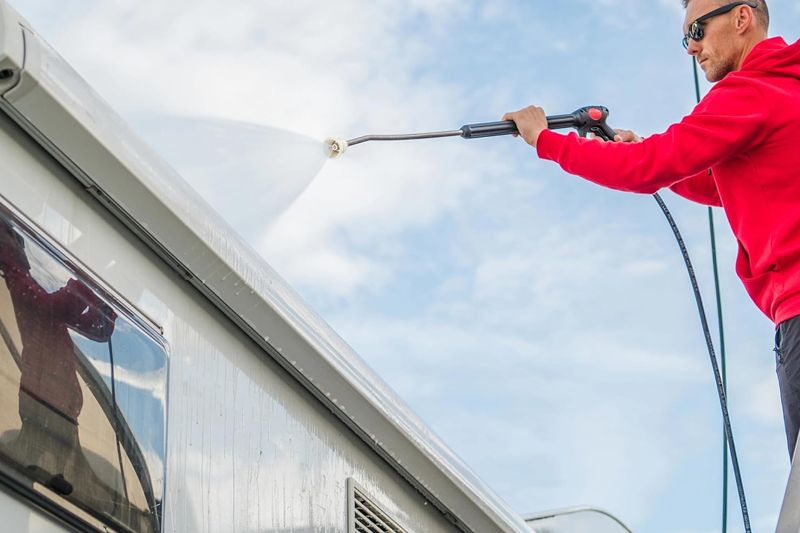
1. Start with the Exterior
The exterior of your motorhome can become covered in bird droppings, mud, and debris, which can make it look and feel rundown and grimy.
Choose an overcast day to clean your vehicle when there is little sun or wind to dry
out your cleaning solution. Start by rinsing the roof of your motorhome with a hose, then spray cleaning solution along the surface.
Gently scrub your vehicle with a soft-bristled brush to remove scuffs and dirt. The cleaning solution will run down the sides, making it easier to clean the rest of the body. Clean any windows with a streak-free glass cleaner.
Use a microfiber cloth to prevent streaks. Once you’ve done this, rinse the surface with your hose and dry it off with a soft towel or cloth to prevent water spots. For the wheels, use a wheel brush and cleaning solution designed for tyres to gently scrub the surface.
To achieve that shiny finish, apply a protective wax or polish to the exterior for a dazzling appearance.
Top Tips
- Never stand on the roof to clean it! Always use a ladder or a long-reach brush.
- When cleaning solar panels, use warm water and mild soap to gently wipe off any dirt and debris.
2. Tidy Up the Interior
If your motorhome has become unorganised and cluttered, it’s time for a spring cleaning. Remove and replace any rubbish bags and remove any loose items, such as pillows, rugs, and personal belongings, for better access to the floor.
Start by vacuuming the floor and any seats, carpets, and nooks in the vehicle. Then, using your multi-purpose cleaner, wipe down any surfaces, such as countertops, cupboards, and tables.
To prevent marks, clean all the windows and mirrors with a streak-free glass cleaner. Once you’ve done this, you can begin replacing any old curtains and bedding and organising any clothes or personal items.
Top tips
- Add an air freshener to the inside of your motorhome to keep it smelling fresh for weeks.
- Use essential oils, candles, and herb bags for a homely interior.
- To keep your motorhome tidy, add organisers such as boxes, shoe bags, and clothes hooks.
3. Sanitise the Kitchen and Bathroom Areas
Keep your bathroom and kitchen fresh and clean, just as you would in your home. Wipe down all surfaces with an antibacterial spray and scrub the inside and outside of your toilet.
Use a drain cleaner for your sink and bath or shower, and scrub away any built-up mildew or stains. A vinegar solution is perfect for removing any marks from sinks and countertops.
Clear out any old food from your fridge and cupboards, scrubbing the shelves before replacing any food items. Dishwasher soap works perfectly for this. When cleaning any ovens, microwaves, or dishwashers, just use a damp cloth to wipe the surfaces.
Remember to scrub your bathroom walls with a soft-bristled brush. Wipe down any handles, knobs, and switches with antibacterial wipes. Then, hoover and mop the floors to remove dust, dirt, and debris.
Top Tips
- When cleaning your toilet bowl, use a soapy water mixture or vinegar solution and a toilet brush. Bleach can damage the seals and plastic in motorhome toilets.
- Opt for motorhome-specific cleaners for kitchens and bathrooms to avoid damage to the surfaces.
4. Empty and Clean the Waste Tanks
Always empty your tanks at a designated dumping station, which can be found at service stations and campsites across the UK.
Once you’ve reached a dumping station, put on your gloves and attach one end of the waste hose securely to the blackwater tank’s outlet. Ensure it’s locked in place, and then insert the other end into the dump station inlet.
Slowly open the blackwater tank valve, allowing the waste to flow out through the hose and into the dump station. If your motorhome has a built-in flushing system for the blackwater tank, use it now to rinse the tank thoroughly.
Repeat the same process for your greywater tank, rinsing it afterwards with fresh water. After emptying both tanks, pour a tank-cleaning solution into the blackwater and greywater tanks via the toilet and sink drains.
Top Tips
- Rinse the waste hose before disconnecting to flush any remaining residue out.
- After the cleaning process, add waste treatment chemicals to the blackwater tank via the toilet.
- Always open windows when emptying the tanks to prevent odours.
Hire a Luxury Motorhome with Melling Motorhomes Today!
If you don’t want to own a motorhome, why not hire one for your next road trip?
At Melling Motorhome, we have a broad range of luxury motorhomes to choose form for your next getaway. From 2-berth to 6-berth options, these are perfect for the whole family or a romantic trip for two!
To find out more or book your stay, contact our team today.